
I Learned How To Create the Perfect Croissant While Playing Pâtissière in Paris


Dining in Paris leans heavily into my three favorite food groups: cheese, bread, and pâtisseries. This is one of the many reasons why the city—a quick flight or train trip from our home in Italy—is my favorite European capital and a frequent destination for quick weekend getaways.
We generally stay in Le Marais, a charming and food-focused district just across the River Seine from Notre Dame, and spend a few days exploring the local fromagerie, boulangerie, and pâtisserie stocked to bursting with French flavors. This time around, however, I was ready to take our Parisian culinary adventures to a new level with a hands-on croissant workshop right in the heart of our preferred neighborhood.
I thought the experience would be a hard sell to my sons—both in their early 20s—but they were surprisingly enthusiastic, especially when they discovered that we would be feasting on our creations at the end of the class (and taking home any leftovers). As it turned out, our entire group of eight participants was made up of parents with their young adult children, so I accidentally discovered a great family activity in Paris that isn’t necessarily focused on younger kids. The class also proved an unforgettable way to break up our sightseeing, gain a deeper appreciation for one of France’s most iconic foods, and make lasting memories for our food-loving family.

We met with our instructor, Delphine, and the other class participants directly at the cooking school, located in a postcard-perfect red storefront space just up the block from Place des Vosges. One of the most elegant historic squares in Paris, this lush public park was a great place to linger and watch Parisians and visitors stroll while we waited for the workshop’s start time (doors open just before the reserved time, so don’t arrive too early). Then, Delphine welcomed us inside, and we donned our aprons and broke the ice over complimentary coffee and tea in the entrance hall before moving into the kitchen space to wash our hands and get to work.
Delphine gave us a quick overview to kick off the workshop, explaining that we would be making classic croissants, chocolate-filled pains au chocolat, and the lesser-known pains au raisin. I was curious about how the timing of the class would work, since I knew that the dough would need time to rise before we could bake it. But the school had worked out the perfect solution—each group prepares the dough for the class to be held the following day.

Once we were settled in pairs around the workspace, Delphine began measuring out the croissant dough ingredients while offering a quick explanation about the role of each, ideal for baking newbies. She explained the importance of using the correct flour, the need for both sugar and salt to flavor and leaven the dough, and the fundamental role of yeast—with helpful hints about how to find each in grocery stores outside of France.
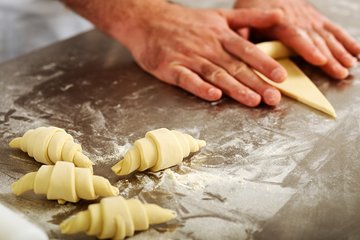
After combining the ingredients, she set the large bowl under the workshop’s mixer to knead while she distributed rectangles of dough that had been prepared for us by the previous class. We got busy rolling, cutting, and shaping our three types of pastry under Delphine’s watchful eye, then transferred our crescent-shaped croissants, folded pains au chocolat, and spiraled pains au raisin (or au chocolate, for the raisin-adverse in the group) onto baking trays for a final resting and raising before baking—known as proofing—in the oven.
While our pastries slowly doubled in size, we paid it forward by preparing the dough for the class the following day. By this time, our dough had been sufficiently kneaded by the mixer and was ready to be laminated—aka, rolled and folded around a layer of cold, unsalted French butter to create the beloved flakiness for which croissants and similar pastries are famous. Though we had just worked with laminated dough, prepared for us by our fellow students the previous day, we had no idea just how much butter it takes to form those luscious layers.

So, after thoroughly washing our hands a second time, we each took a remarkably sizable chunk of butter from Delphine to roll into a thin rectangular sheet. She explained the importance of using the correct fat content (French butter, of course, though she conceded that Danish, Irish, and other types of high-fat butter work in a pinch) and supervised as each couple rolled their dough to the perfect size to wrap around the butter layer in what is known as a “French fold”.
Once each pair had rolled their dough and butter into a thin rectangle, Delphine demonstrated how to fold it again in a “letter fold”, then roll it out and finish with a final letter fold to create dozens of alternating layers of dough and butter. The rolling and folding had to be precise to make the geometry of this pastry origami work, but Delphine was patient and helped each of us along the way. I was proud—and pleasantly surprised—to see that our handiwork came out looking sufficiently professional on our first go.
Then, she stored away our laminated dough rectangles to rest in the fridge for 24 hours for the class the following day, before taking our beautifully risen pastries out of the oven. She showed us how to delicately paint each with a milk wash for an elegant final sheen before popping the pans into the oven to bake. The smell wafting out of our workshop was so enticing that a few students from the macaron workshop next door wandered in to ask if we would be willing to barter a few of our creations for some of theirs. (There were no takers.)

In just a few minutes—faster than you might expect!—our spectacular croissants, pains au chocolat, and pains au raisins came out of the oven, baked to flaky, golden perfection. They were too hot to eat immediately, but we gathered around to admire them as they cooled off, counting the seconds until we could dig in. As soon as they had cooled enough to pluck off the baking pans, we sampled our handiwork—we had written our names on the paper lining each pan so we could recognize our own creations—and were amazed that we had managed to turn out perfect buttery, flaky croissants and pastries in just two hours.
Each of us had made two of each kind of pastry, and even the biggest sweet tooth would have a hard time putting down six in one sitting. Luckily, Delphine had bags on hand so we could pack up our leftovers and nibble on them for the next day or two. In fact, we were still enjoying our pastries the following day, after warming them in the oven briefly to crisp them up. (Though the class provides paper bags, these buttery pastries immediately soak through; bring a plastic bag of your own to the class so you can carry your precious cargo in your purse or backpack without transferring butter stains.)
As we were wrapping up the workshop, Delphine asked us if we were ready to try making croissants at home. Despite the very detailed recipe and step-by-step instructions that arrived by email shortly after the class, I’m not sure we’ll ever make croissants in our home kitchen. From Italy, it’s quicker to hop the border into France to enjoy fresh croissants than to make them on our own from scratch. But in a pinch, I know we now have the kitchen skills to pull it off if we ever get a hankering.
This tour was provided courtesy of Viator.
Book more things to do in Paris


Keep reading


